Human ECM models represent a next-generation alternative to conventional ECM models, such as pepsin-digested hydrogels, synthetic scaffolds, or tumor-derived matrices. hECM can enable control of chemical and mechanical properties of the engineered model, including stiffness, porosity, cell attachment sites, and water uptake.
Developed through a novel approach to chaotropic protein reconstitution, hECM preserves insoluble ECM components in a stable colloidal state. It contains structural components such as fibronectin, hyaluronic acid, collagens, and proteoglycans, as well as matricellular proteins including SPARC, tenascin, and osteopontin. It is also enriched with ECM-bound growth factors that support cell signaling, proliferation, and tissue remodeling.
Human-derived ECM dispersion can behave like a sol-gel system at concentrations above the critical gelation point. Surprisingly, due to the high affinity of the ECM proteins to cellular plasma membrane proteins and polysaccharide residues, the hydrogel self-assembly can occur much below the critical point. Several types of objects arise from that process. At the undisturbed sedimentation conditions and relatively high gel concentrations (20x below the critical gelation point) the homogeneous films start to form and sediment. Those films can be additionally contracted by the mechanically active cells (fibroblasts, or other alpha-SMA expressing cells). Whenever, at concentrations significantly below the critical gelation point (100x from the CGC), the defined morphology spheres start to appear. The sphere formation process passes through, first, formation of amorphous aggregates, which, within a short re-organize into the well-ordered structures (https://youtu.be/lOty8z8LkqI). To increase the homogeneity of the formed structures, we apply gentle magnetic stirring. The homogeneity of the size distribution of the gel-like aggregates in the dispersion determines the homogeneity of the spheres formed afterwards.
Fibroblasts, including cancer-associated fibroblasts, are the most prominent drivers of formation for such objects. After the equilibration of the formed structures, fibroblasts settle at the organoid periphery, leaving the inside structure to the other cells trapped inside the ECM aggregates.
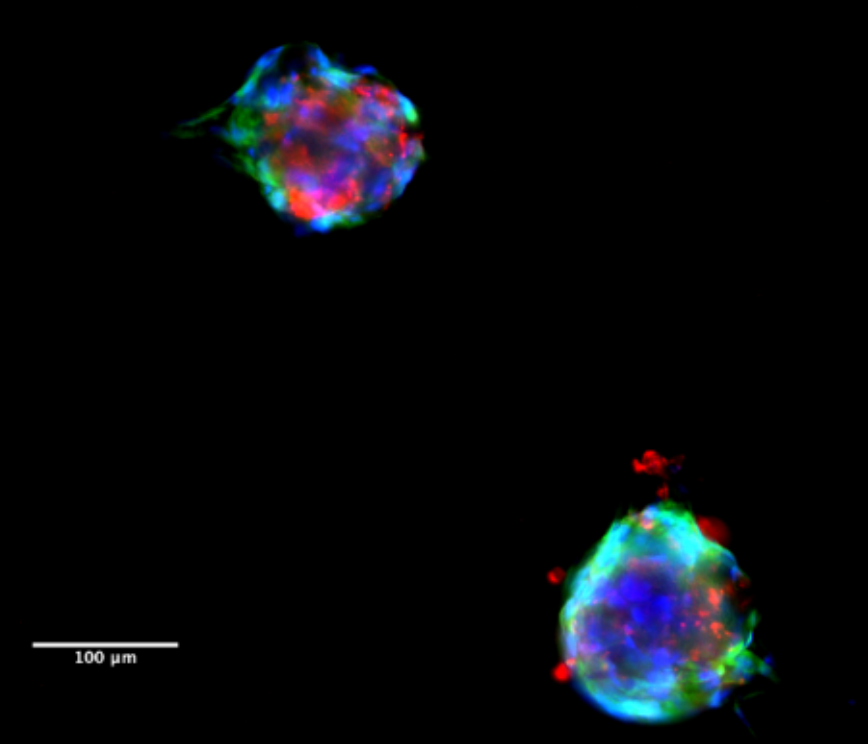
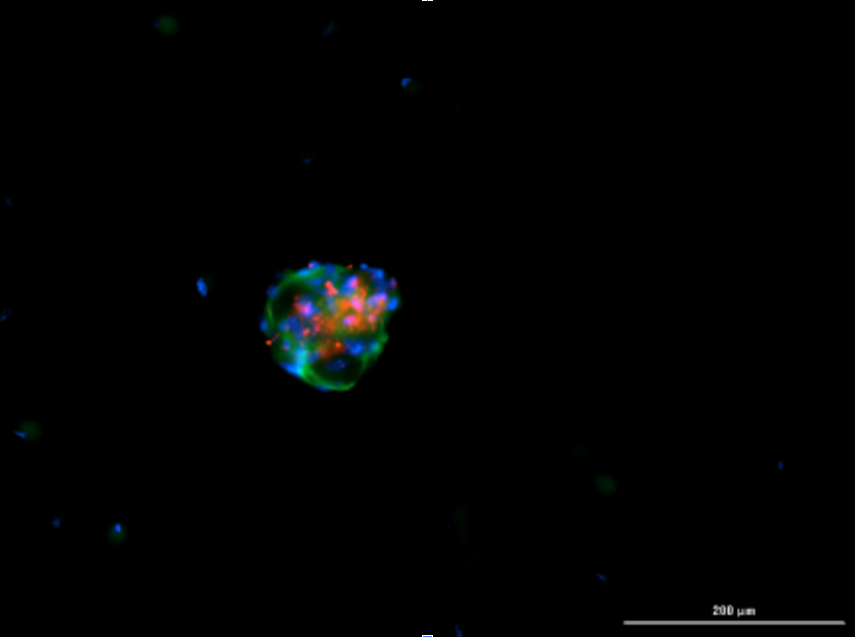
Fluorescent images of the tumoroids, formed by a combination of patient-derived cancer cells, CAFs, and ECM. (Blue – DAPI, Green – alpha-SMA, Red – EpCAM).
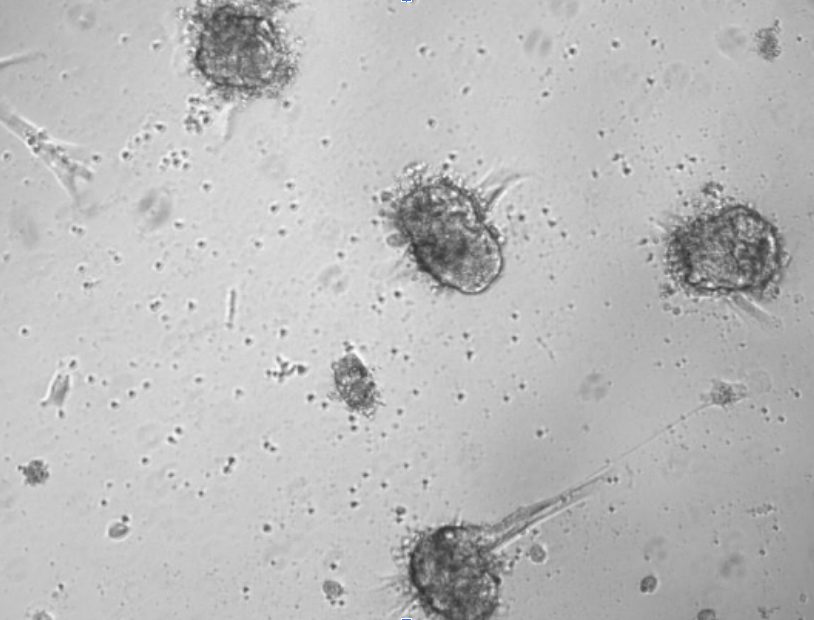
In case of using tumor cells, the objects appear to be passageable and can remain viable in culture for a significant period. After a certain variable period of time, some cells start to migrate from the aggregates, and this appears to be a good indicator of the appropriate moment for the sphere passaging. After the addition of more ECM, the spheres regain their well-structured morphology and continue growing in culture.

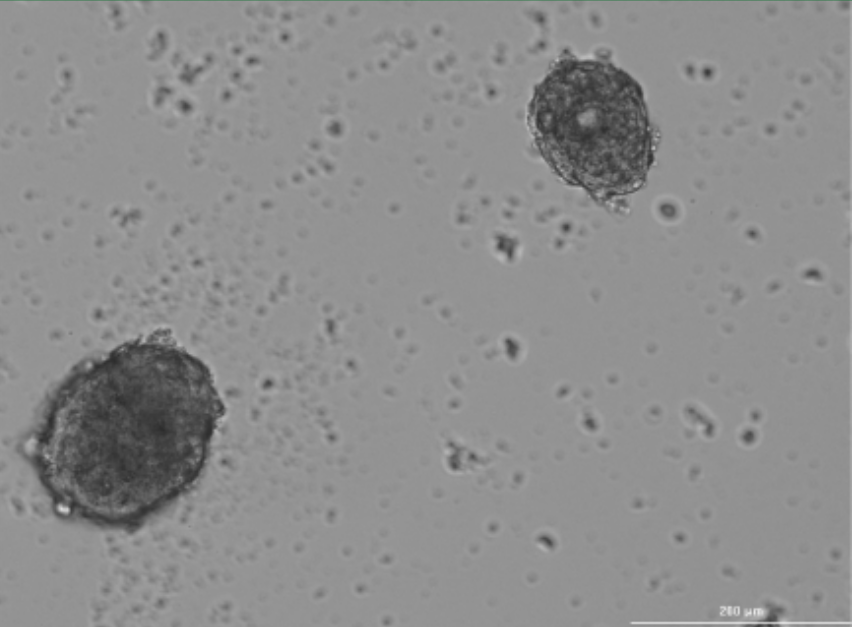
On the right – spheres before passaging, on the left – after passaging and 48 hours of growth.
For the application in tumor modeling, the tumoroid formation methodology appeared to be compatible with colorectal, breast, ovarian, lung cancer-derived cells, as well as HCC.
Below, we describe the optimized protocol for the formation and passaging of the formed tumoroids.
1. Thawing and cultivation protocols for PDCs (patient-derived digested cells), CAFs (cancer-associated fibroblasts)
Materials:
- DMEM (Dulbecco’s Modified Eagle Medium)
- FBS (Fetal Bovine Serum)
- B-27 Supplement
- GlutaMAX
- EGF (Epidermal Growth Factor)
- bFGF (basic Fibroblast Growth Factor)
- Antibiotic-Antimycotic (A/A) Solution
- Cryopreserved CAFs (cancer-associated fibroblasts)
- Cryopreserved PDCs (patient-derived digested cells)
Breast CAF Thawing, cultivation protocol
- Prepare the thawing medium that consists of DMEM with 10% fetal bovine serum (FBS) and 1% antibiotic-antimycotic (A/A).
- Pre-warm the complete medium to 37°C in a water bath or warming block.
- Quickly remove the cryovial from liquid nitrogen storage and transfer it to a 37°C water bath. Submerge the bottom part of the vial (not the cap) into the water bath and gently swirl continuously.
- Thaw the cells completely within 1–2 minutes. Thaw until only a small ice crystal remains.
- Disinfect the outside of the vial with 70% ethanol and transfer it to a biosafety cabinet.
- Open the vial and transfer the cell suspension to a conical tube containing 10 ml complete medium. Rinse the cryovial once with approximately 1 mL of the medium and combine with the cells in the conical tube.
- Centrifuge for 10 minutes at 800 × g at room temperature.
- Aspirate the medium, taking care not to disturb the pellet.
- Add the medium and resuspend the pellet by gently pipetting.
- Gently mix the contents of the vial, then take a small aliquot to assess cell viability and concentration using an automated cell counter or Trypan Blue exclusion assay.
- Calculate the required volume of cell suspension to seed 5,000–10,000 cells/cm² into the desired tissue culture-treated vessel.
- Gently rock or swirl the flask or plate to evenly distribute the cells.
- Incubate at 37°C and 5% CO2. Do not disturb for the first 12–16 hours to allow cell attachment.
- Replace the medium after 16–24 hours to remove non-viable cells.
- Change medium every 2–3 days, or as needed based on cell growth.
Note: For organoid assembly, use CAFs immediately after trypsinization to ensure optimal viability and integration into the ECM.
PDCs thawing protocol
- Prepare the thawing medium that consists of DMEM with 2% B-27, 1% GlutaMax, 20 ng/ml EGF, 20 ng/ml bFGF, and 1% antibiotic-antimycotic (A/A).
- Pre-warm the complete medium to 37°C in a water bath or warming block.
- Quickly remove the cryovial from liquid nitrogen storage and transfer it to a 37°C water bath. Submerge the bottom part of the vial (not the cap) into the water bath and gently swirl continuously.
- Thaw the cells completely within 1–2 minutes. Thaw until only a small ice crystal remains.
- Disinfect the outside of the vial with 70% ethanol and transfer it to a biosafety cabinet.
- Open the vial and transfer cell suspension to conical tube containing 8 ml complete medium. Rinse the cryovial once with approximately 1 mL of the medium and combine with cells in the conical tube.
- Centrifuge for 10 minutes at 600 × g at room temperature.
- Aspirate the medium, taking care not to disturb pellet.
- Add the medium and resuspend the pellet by gently pipetting.
- Gently mix the contents of the vial, then take a small aliquot to assess cell viability and concentration using an automated cell counter or Trypan Blue exclusion assay.
- Calculate the required amount of PDCs for the experiment.
Note: Immediately after thawing, use the entire vial of PDCs for organoid assembly.
2. General handling ECM advice
Storage:
For long-term storage, keep hECM at -80°C to maintain its properties. Avoid storing it at higher temperatures, as this may degrade its quality. If you do not need the entire vial for your experiment, aliquot the gel into smaller volumes and store these aliquots at -80°C.
Note: Repeated freezing and thawing should be avoided.
Thawing:
Rapidly thaw the hECM vial in a water bath set to 37°C, allowing only a small ice crystal to remain. Thawing should be completed within 3–5 minutes to prevent secondary ice formation.
Resuspension:
Ensure the gel is fully resuspended before use. This can be achieved by vortexing, using a micropipette, or briefly exposing the gel to an ultrasonic bath (up to 2 minutes) to ensure uniform dispersion.
Handling During Use:
Keep the hECM at or below 4°C during use. Always store it on ice, when possible, to preserve its stability and consistency.
Medium Change:
When changing the medium, do not add ice-cold medium to the wells, as this could damage the ECM-formed networks. Always change the medium gently and carefully to preserve the integrity of the gel layer. Use a warmed medium for the best hECM stability. Use a 200 µL sampler to aspirate and add the medium. When adding or removing medium, ensure that you do so along the sides of the well to prevent disturbance of the gel layer.
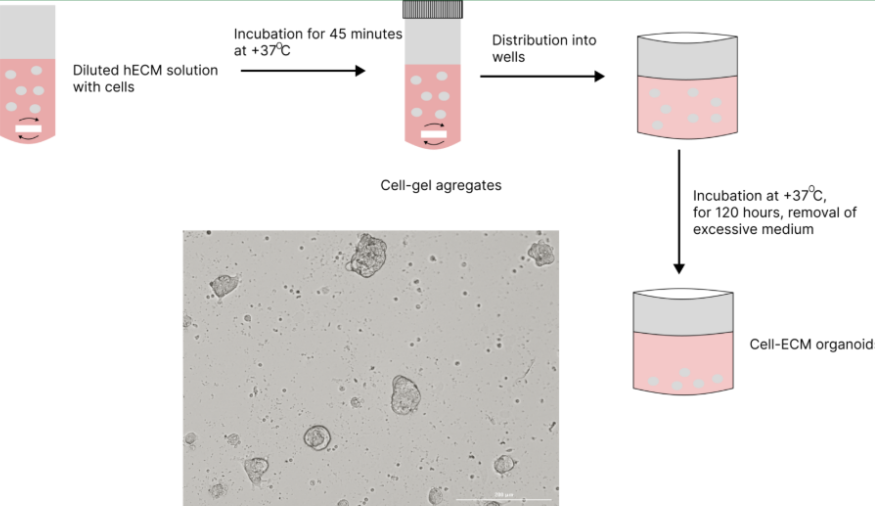
3. Organoid self-assembly: description, materials, procedure, expected results
This protocol generates 3D organoids by suspending cells in a low-concentration extracellular matrix (ECM) hydrogel and incubating the mixture under gentle stirring. The method allows uniform, spontaneous organoid formation by first promoting the formation of cell-matrix interaction in the stirred vessel and afterwards seeding the formed aggregates, followed by the self-organization of the formed aggregates into the complex multicellular structures. Those structures are characterized by a compact shape with CAFs placed on the organoid surface and the contents filled with epithelial cells. The resulting organoids are suitable for downstream applications such as imaging, drug screening, transcriptomics, or functional assays.
Method advantages
- High-throughput compatibility: Easily scaled to 96-well or 384-well plate formats.
- Rapid and reproducible: Organoids form within 48–72 hours under controlled stirring conditions, with consistent morphology.
- Ideal for co-culture applications: Supports the integration of multiple cell types, including stromal, epithelial, and tumor cells, facilitating studies of cell–cell and cell–matrix interactions in a physiologically relevant 3D context.
Method limitations:
- Heterogeneity risk: Inconsistent stirring speed or gel distribution can lead to variable organoid size and shape across wells.
- Dependence on stirring conditions: Consistent organoid formation requires controlled stirring; minor variations in stirrer speed or setup between laboratories may influence aggregate uniformity.
Materials:
- hECM hydrogel
- CAFs in 0.2 mln/ml concentration. CAFs should be plated after thawing and allowed to grow till confluency before use.
- PDCs after thawing in a 0.8 mln/ml concentration
- Cell culture medium for PDC/CAFs/ECM co-culture (DMEM with 2% B-27, 1% GlutaMax, 20 ng/ml EGF, 20 ng/ml FGF, and 1% antibiotic-antimycotic (A/A))
- 96-well flat-bottom plates (low-attachment plates are preferable to minimize CAFs migration)
- Magnetic stir bar (small size suitable for Eppendorf tube)
- Magnetic stirrer with adjustable RPM
- Sterile conical tubes for small volumes (2-5 mL)
- Sonicator or ultrasonic bath (for gel homogenization)
- 37°C cell culture incubator with 5% CO₂
Procedure:
- After trypsinization, resuspend CAFs in culture medium. Thaw PDCs according to the thawing protocol. Combine the two cell types to prepare a mixed cell suspension. For co-culture spheroid formation, CAFs and PDСs are combined at a 1:4 ratio. For 1 mL of diluted ECM gel, use 200,000 CAFs and 800,000 PDCs, yielding a total of 1,000,000 cells/mL.
- Dilute the gel in culture medium. A 1:100 dilution is recommended, depending on the desired sphere size. More gel results in larger aggregates. For better homogenization, sonicate the diluted gel if needed.
- Mix the gel and cells, then resuspend the mixture. Add a magnetic stir bar into the tube.
- Incubate at 37°C on a magnetic stirrer for 45 min with gentle stirring. (approximately 250-300 rpm)
- After incubation, carefully remove the magnetic stir bar, then mix the suspension gently by inverting the tube.
- Dilute the suspension 5-fold. Do not resuspend by pipetting—mix gently by inverting the tube. Use warm cell culture medium for dilution.
- Dispense 200 µL of the suspension into each well of a 96-well plate. Use either a 1 mL pipette or a 200 µL pipette with the tip cut to ensure smoother transfer.
- Incubate at 37°C for 48h to allow sphere formation.
- Carefully change the culture medium.
Expected results:
After 48 hours of incubation, uniform and compact organoids should be visible in each well. Organoids are typically spherical, well-defined, and evenly distributed across wells.
At 48 hours post-seeding, we recommend replacing the culture medium to remove cellular debris and unbonded cells.
With prolonged incubation, organoids will undergo compaction, develop a more defined outer membrane, and exhibit progressive growth in size and density.
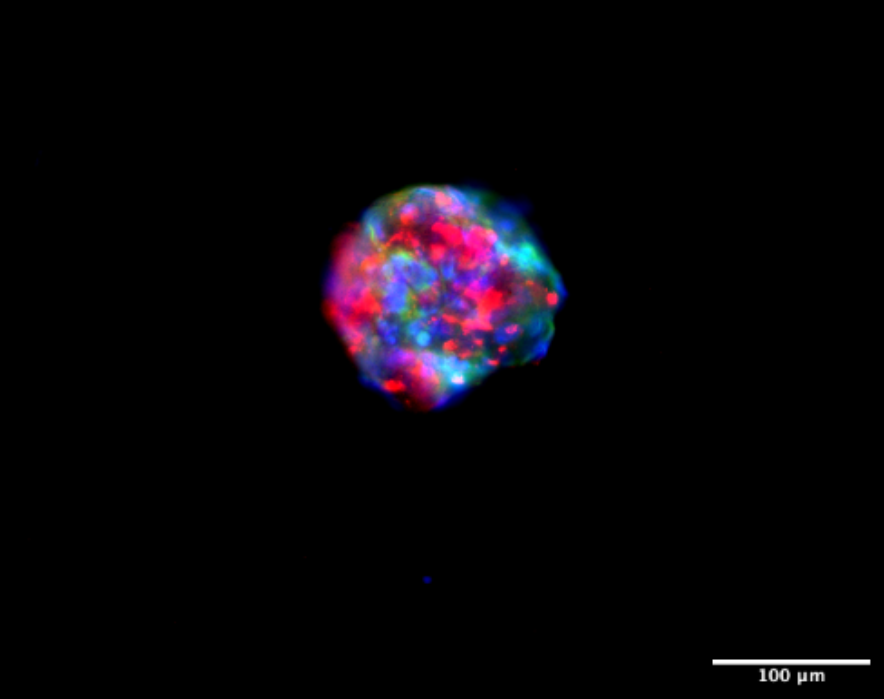
Immunofluorescent imaging of organoids at day 7 shows αSMA+ fibroblasts (green), EpCAM+ cancer cells (red), and nuclei stained with DAPI (blue).
4. Protocol for passaging organoids
- Aspirate culture medium from each well carefully, avoiding disruption of the organoids.
- Add 100 µL of pre-warmed trypsin-EDTA (0.05%) directly into each well.
- Incubate for 2 minutes at 37°C.
- Gently pipette up and down 2–3 times to dissociate organoids into small clusters.
- Collect the cell suspension from all wells into a single conical tube.
- Add an equal volume of complete medium to neutralize trypsin.
- Centrifuge at 300 × g for 3–5 minutes at room temperature.
- Aspirate the supernatant carefully without disturbing the pellet.
- Resuspend the pellet in fresh culture medium to the desired organoid concentration.
- Dispense 200 µL per well into a new 96-well plate using a 1 mL pipette for better control.
- Incubate at 37°C without stirring. Organoids will spontaneously reform in static culture.
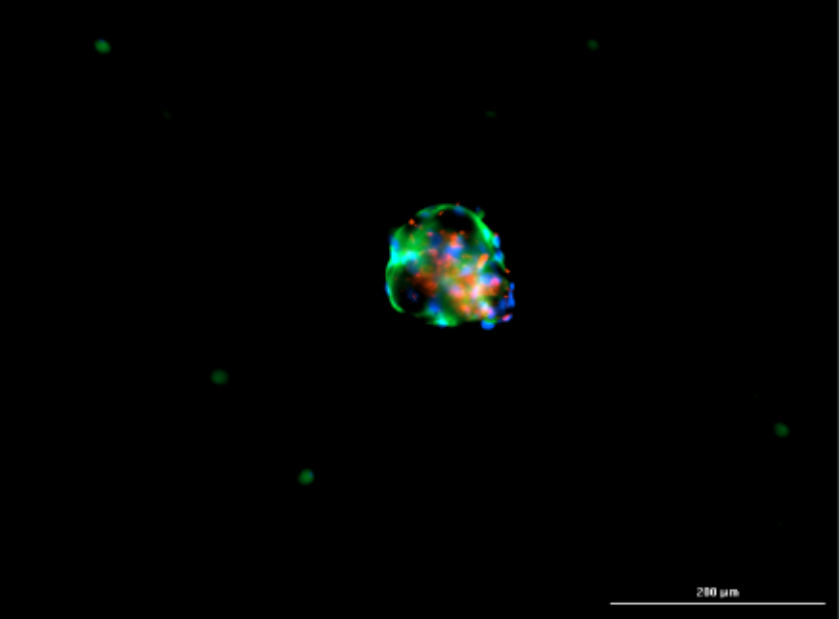
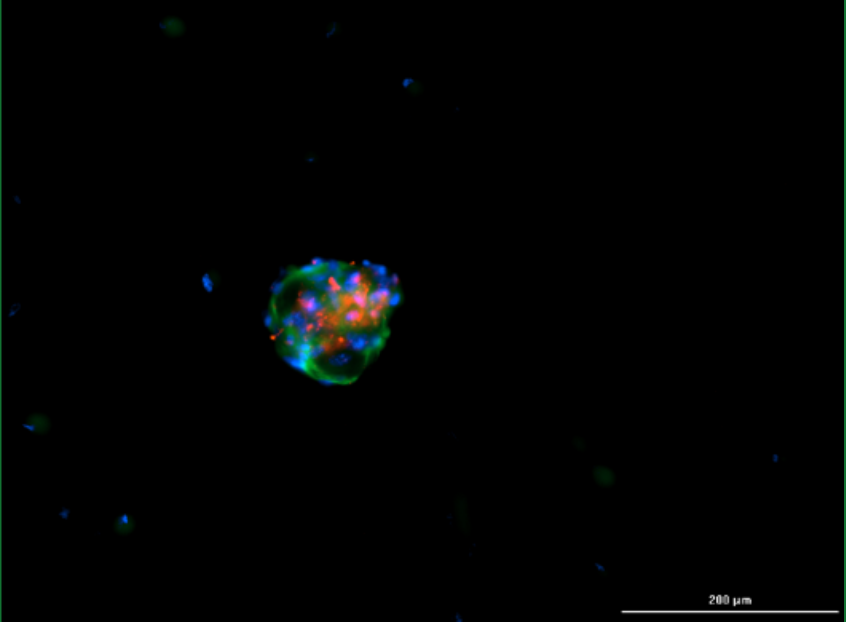
Immunofluorescent imaging of organoids after passaging at day 3 shows αSMA+ fibroblasts (green), EpCAM+ cancer cells (red), and nuclei stained with DAPI (blue).
We invite you to learn more about the methodology and clinical evidence behind our technologies, or consult our specialists to optimize this protocol for your specific research requirements.
Written by Mariia Moshkivska