Why Elasticity Matters in Biomaterials
The elasticity of biomaterials is of key importance in their performance in organ modeling and tissue engineering. In nature, the mechanotransduction, conversion of mechanical stimuli from the cell environment into biochemical reactions, is one of the major signaling cues for cell behavior. Numerous studies confirm that the mechanoresponsive properties of the ECM directly affect cell proliferation, differentiation, and apoptosis initiation. That is why measuring Young’s modulus is a very important method in research into the biomechanics of cellular processes.
Micropipette Aspiration Method
The aspiration method for determining the elasticity of soft materials using a micropipette is simple and powerful in biomechanical systems. It assumes that the height of the material lifted without breaking in the pipette depends on the elasticity (Young’s) modulus at constant pressure. The lift of the material without rupture is taken as the elastic deformation of the body and is directly proportional to the elasticity. Due to the fact that measurements are taken at constant pressure, we can extrapolate the value of the material lift to the Young’s modulus using a calibration curve.
Materials and equipment
1. Embryological micropipette
2. Glass biopsy pipettes (d < 30 um, stick-shaped)
3. Acrylamide
4. Bis-acrylamide
5. TEMED (Tetramethylethylenediamine)
6. Microscope with video camera
Procedure
1. Prepare polyacrylamide gels with the concentrations specified in the table below. These are standards for constructing a calibration curve based on Young’s modulus.
| Acrylamide, % | Bis-acrylamide, % | E, (kPa) |
| 3 | 0,03 | 0,2 |
| 3 | 0,06 | 0,48 |
| 4 | 0,03 | 0,71 |
| 5 | 0,03 | 1 |
| 3 | 0,1 | 1,1 |
| 4 | 0,06 | 1,16 |
| 3 | 0,15 | 1,27 |
2. Immediately after preparation, dispense 100 μl of each standard in three replicates into a 96-well microbiological plate. Wait 45 minutes for a stable gel to form.
3. During this time, prepare the microscope and micropipette. Carefully remove the glass pipette and insert it into the micropipette. Adjust the microscope camera, the light on the microscope, and wipe the lens you will be using.
4. Carefully lift the edges of the standards with the sample to allow the pipette to access the edges. Place the plate under the microscope.
5. Set the desired volume (≈3 μl) on the micropipette. The volume cannot be changed during the entire study.
6. Fix the micropipette in one position relative to your samples.
7. Carefully bring the pipette to the sample so that the tip of the pipette touches the edge of the sample. Select a specific volume. Wait until the level of material in the pipette stabilises and changes over time.
8. Take a picture of the pipette with the material inside.
9. Repeat this procedure for all standards and samples.
10. In ImageJ, measure the height of the standards and samples in the pipette in pixels. Measure the mean and standard deviation in three replicates.
11. Plot a curve of the Young’s modulus of the standards and their height. Use this graph to determine the Young’s modulus of your samples.
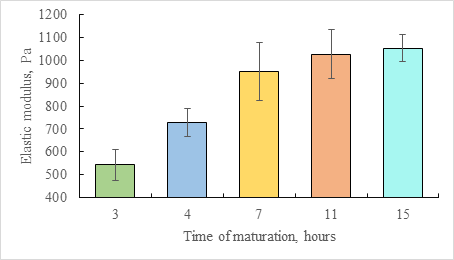
This method was used to study the maturation of the collagen sol-gel system. After the formation of the hydrogel from the sol at protein concentration 16 mg/mL during the initial 3 hours of the incubation at +37 °C, the average elastic modulus was 543 Pa (SD = 67 Pa) and increased to 951 Pa (SD = 126 Pa) upon standing in the closed container for the following 4 hours. After 15 hours, the value of the elastic modulus stabilized at 1053 Pa (SD = 60 Pa).
To understand the engineering behind these biomaterials and how they integrate with automated systems, you can explore our core technologies.